RAM
(Random Access Memory) installation is one of the common steps in repairing
laptops. A laptop technician may have to upgrade the RAM in order to improve
the laptop performance or have to remove since it is not compatible with the
system. Here, steps explaining RAM installation process is discussed from a
laptop repairing course module.
The Process of RAM Installation:
- First, arrange for a well-lighted area before heading in the process. Place a small container near the place so that you collect all the small screws into it. If possible, see the diagram steps so that you do not forget anything. Make the toolkit ready and keep it safe above the table.
- The second step as per the laptop repairing course module is to turn off the system. Unplug all the peripherals attached to the laptop. Remove the battery, which is located normally in the bottom side of the laptop.
- Now,
since the RAM is located to the base of the system hence it is better to turn
the laptop upside down. If you need help then you can check the model diagram present
in the manufacturer’s manual. You can also revise the notes provided in the
laptop repair institute in Delhi.
- Get yourself free from all the ESD that is electric static charge from the body. This will prevent damaging the chip/components /parts inside the laptop. Take out your toolkit and select the high-precision screwdriver from the same. Always remember to use a screwdriver of high quality and not the local ones available in the market. Cheap tools will damage the screws and the laptop body.
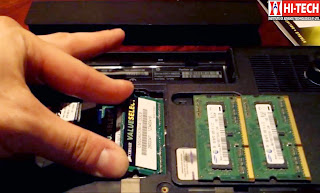
- Check the memory modules so that you do not forget the steps while installing the RAM. Easily lift the compartment cover from the system as mentioned in the laptop repairing course module. Remove the existing RAM by pulling the retention clips to the above. Hold the edge and pull it gently without causing damage to the other nearby slots.
- Take the new RAM and insert it carefully into the compartment. To insert it, apply a little pressure so that the RAM get fits into the slot. Make sure that the RAM is intact with the clips to the side.
- Now, start the assembling process again by placing the cover again. Tighten the screws that you have put in the small container. Reattach all the devices previously plug-in the laptop.
When
everything is plug-in as per the laptop repairing course notes, then turn on
the laptop system normally. You will notice ample improvement in the processing
system of the laptops.
| Read: Commonly used tools in chip level laptop repairing course |


If possible, see the diagram steps so that you do not forget anything. laptop repair nottingham
ReplyDeleteThere are available many laptop repairing service center in Jaipur. You can go there and consult them. I got more information about laptop repairing institute which are offering various courses in Jaipur.
ReplyDeleteBest and comprehensive guidelines to start a computer store. if you need any further help in this regard you may contact Same Day Geek
ReplyDelete